
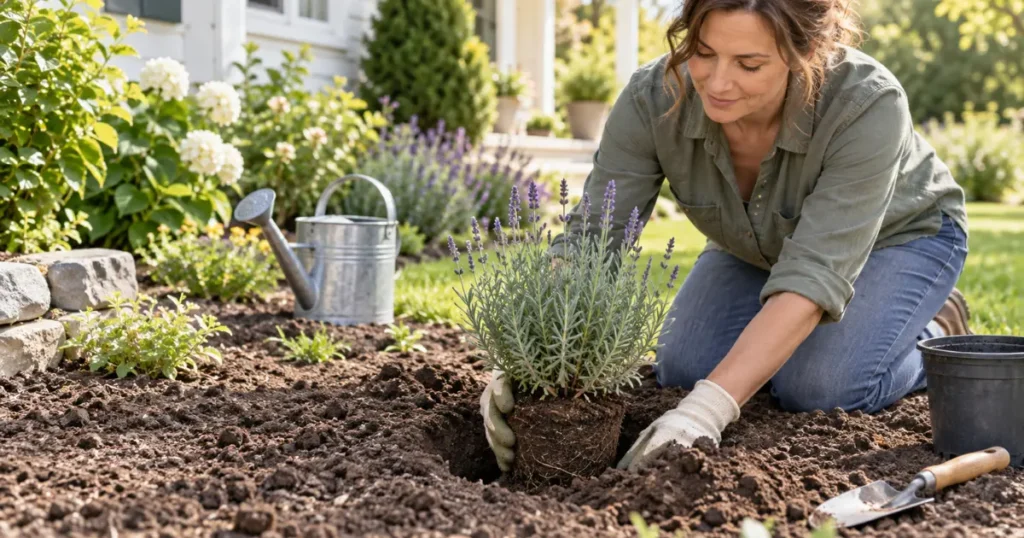
How to plant lavender in a sunny, well-drained garden bed using a nursery-grown plant

How to Plant Lavender: A Beginner’s Step-by-Step Guide

Planting lavender successfully starts with the site. If you are learning how to plant lavender, choose a location with abundant sunlight, excellent drainage, and enough room for the plant to reach its mature size before you start digging.

This guide is primarily for gardeners who already have an established, nursery-grown lavender plant in a container and want to plant it outdoors in the ground. It covers the best planting time, where to place lavender, suitable soil conditions, spacing, and the physical planting process.

Lavender generally performs poorly where its roots remain persistently wet, so drainage deserves just as much attention as sunlight. Planting time also varies across the United States: spring is often practical, but fall or summer planting may also work when local climate and weather allow the plant enough opportunity to establish.

The goal is not to create an unusually rich planting hole. It is to place a suitable lavender plant into a site where its roots can establish under conditions the plant can tolerate.

Quick Summary

  • The best planting period depends on your climate, frost risk, soil conditions, and upcoming weather rather than one nationwide date.
  • Learning how to plant lavender starts with choosing a sunny site where excess water drains away readily.
  • Avoid low areas and garden soil that remains persistently soggy after rain.
  • Lavender generally prefers relatively free-draining soil and does not need an artificially rich planting pocket.
  • Use the expected mature width of your cultivar to decide how much space to leave between plants.
  • Prepare the planting area without automatically adding fertilizer, manure, or large amounts of compost.
  • Planting level matters: the root ball should ultimately sit appropriately in relation to the surrounding soil rather than being buried deeply.
  • Newly planted lavender needs appropriate moisture while establishing, but watering should respond to soil and weather conditions rather than a rigid schedule.

When Is the Best Time to Plant Lavender?

There is no single best calendar date for planting lavender across the United States.

The useful question is whether local conditions will give a nursery-grown plant enough time to establish without immediately facing severe cold, saturated winter soil, or extreme summer heat.

Plant type matters too. English lavender and lavandins can differ in cold hardiness from more tender lavender types, so check the plant label or reliable cultivar information before assuming a particular planting season is equally suitable for every lavender.

Colorado State University Extension, for example, reports that lavender can be planted from spring through fall under Colorado conditions and notes that planting season affects establishment considerations. That is useful regional evidence, but it should not be converted into one national calendar for every US gardener.

Planting Lavender in Spring

Spring is often a practical time to establish lavender because the plant can develop roots through the growing season before the following winter.

Wait until local conditions are suitable for the lavender you are planting. In colder regions, that generally means moving beyond periods when newly planted material is likely to face damaging late cold. Soil should also be workable rather than saturated from prolonged wet weather.

Colorado State’s guidance notes that spring-planted lavender in its region has a long growing season in which to establish roots.

Do not translate that principle into one nationwide month. Spring conditions in Minnesota, Virginia, Arizona, and coastal California are not interchangeable.

Can You Plant Lavender in Fall?

Yes, fall planting can work in suitable climates and conditions.

The important question is whether the plant has enough opportunity to begin establishing before severe winter weather, particularly where cold and wet conditions arrive quickly.

Fall planting is not automatically a poor choice. Colorado State University Extension cites successful fall establishment under Colorado/New Mexico research conditions, while also emphasizing the importance of a well-established root system going into winter.

In a region where winter soil remains cold and wet for long periods, late planting deserves more caution. Check local Extension guidance and the hardiness of the lavender you have rather than treating fall planting as universally safe.

Can You Plant Lavender in Summer?

Lavender can sometimes be planted in summer, but hot weather can make establishment more demanding.

A nursery plant moved from a protected retail environment into a hot, exposed garden bed may lose moisture more quickly while its roots are still confined largely to the original root ball.

If summer planting is necessary, choose a period when you can monitor the plant closely and avoid combining transplant stress with the most severe heat your climate normally experiences.

Do not compensate by keeping the planting area constantly wet. Lavender still needs a well-drained root zone.

Where Is the Best Place to Plant Lavender?

The best place is usually an open, sunny location with fast drainage and enough space for the plant to develop without being crowded.

For a homeowner choosing between several garden locations, prioritize the site itself before thinking about decorative combinations.

A promising planting position should offer:

  • abundant direct sunlight;
  • soil that drains readily after rain;
  • no routine standing water;
  • adequate space for the mature cultivar;
  • conditions appropriate to the hardiness of the lavender you purchased.

Gardener checking a sunny, well-drained site before planting lavender

Illinois Extension describes full sun and extremely well-drained soil as two central requirements for lavender and warns that persistently wet soil can shorten plant life. Illinois Extension’s lavender growing guidance

How Much Sun Does Lavender Need?

Lavender is a sun-loving plant and is best placed where it receives strong direct light for much of the day.

You may see precise hourly recommendations in regional guides. Those can be helpful in context, but light intensity, latitude, heat, nearby structures, and lavender type also vary.

For a general US planting decision, choose the sunniest suitable location available rather than a shaded or heavily obstructed bed.

Do not use sunlight as the only criterion. A bright location that remains waterlogged after every storm is still a poor lavender site.

Check Drainage Before You Plant

Drainage is one of the most important things to evaluate before a lavender goes into the ground.

Look at the proposed area after rain.

Warning signs include:

  • water that remains pooled or slow to disappear;
  • soil that stays soggy for long periods;
  • a low spot where runoff collects;
  • very dense soil that remains wet around the root zone.

Lavender roots need access to air as well as moisture. A constantly saturated site can create conditions favorable to root decline and rot.

If you already know a bed stays wet, do not assume that digging a hole and filling it with richer soil will solve the problem. The surrounding drainage pattern still matters.

The Royal Horticultural Society likewise emphasizes a sunny position and free-draining soil for lavender. RHS lavender growing guide

What Soil Is Best for Planting Lavender?

Lavender generally performs best in soil that drains freely rather than remaining wet around the roots.

That matters more than creating an unusually fertile planting area.

Many lavender types are adapted to comparatively lean, mineral soils. Excessively rich conditions should not automatically be treated as an improvement, especially if amendments make the planting area hold substantially more water.

The practical priorities are:

  • good drainage;
  • enough air in the root zone;
  • avoidance of persistent saturation;
  • soil conditions reasonably suited to the lavender type;
  • avoiding unnecessary enrichment simply because the plant is new.

Heavy soil can be difficult because small pore spaces can hold water for longer periods. However, changing heavy soil requires care. Adding a little sand or gravel to a small planting hole is not automatically a safe solution and can create an abrupt difference between the amended pocket and surrounding soil.

Colorado State University Extension specifically warns that adding sand or gravel to heavy soil can worsen drainage problems in some circumstances.

If your site consistently stays wet, a different position or a properly designed raised planting area may be more reliable than attempting to create a small isolated pocket of “perfect” soil.

Avoid automatically adding fertilizer, fresh manure, or large quantities of compost at planting. First address the physical suitability of the site.

Does Lavender Need a Specific Soil pH?

Lavender commonly performs well in soils that are around neutral to somewhat alkaline, but there is no need to chase one supposedly perfect pH for every species and cultivar.

For example, Utah State University Extension gives a pH range of 6.5–7.5 for English lavender in its regional guidance. That is useful for Lavandula angustifolia under those conditions, not a reason to assume every lavender everywhere requires exactly the same range.

If you are concerned about unusually acidic or alkaline soil, a soil test is more useful than guessing.

For most beginners choosing between two garden sites, drainage should receive more attention than trying to adjust a slightly imperfect pH before planting.

How Far Apart Should You Plant Lavender?

Lavender spacing should be based on the expected mature width of the cultivar rather than one universal distance.

A compact English lavender can occupy much less space than a large lavandin. That difference matters when plants are set out in a bed.

Check the plant label, nursery information, or a reliable cultivar description for mature spread.

For individual plants or informal groups, allow enough room for each plant to develop its natural form and for air to move between neighboring plants.

If you plan to mix lavender with other plants, choose lavender companion plants that suit similar sunlight, drainage, and moisture conditions.

If you are deliberately creating a hedge or edging, closer spacing may be appropriate because the goal is for neighboring plants to grow into a more continuous line. That is a different planting objective from growing separate specimens.

The RHS provides different spacing recommendations for grouped plants and lavender hedges, illustrating why planting purpose affects distance.

For a beginner, the simplest approach is:

use mature plant width as your starting point, then adjust only when you have a specific design reason to plant more closely.

Avoid judging spacing by the size of the small nursery plant you are holding today.

How to Plant Lavender in the Ground Step by Step

The following steps explain how to plant lavender when you already have an established, nursery-grown plant in a container.

If you are starting with seed instead, that is a different process involving sowing, germination, seedling care, and hardening off rather than planting an established nursery-grown lavender plant.

Step 1: Choose the Right Planting Site

Before removing the plant from its pot, confirm three things.

First, make sure the location receives abundant sunlight.

Second, check that water drains away instead of remaining around the planting area after rain.

Third, make sure there is enough room for the lavender’s expected mature width without crowding walls, paths, shrubs, or neighboring plants.

If the site fails one of these basic checks, reconsider the location before digging. It is easier to move an unopened nursery pot than to correct a fundamentally unsuitable planting position after the lavender is in the ground.

Step 2: Prepare the Planting Area

Clear weeds and competing vegetation from the immediate planting area so the young lavender is not immediately surrounded by plants competing for light and root space.

Look again at the soil while you work. If it is saturated, sticky from prolonged wetness, or sitting in a known drainage problem, postpone planting or choose a more suitable location rather than forcing the job.

Do not automatically add fertilizer, manure, or a large amount of compost to the hole.

Lavender does not need an artificially rich pocket of soil simply because it is being transplanted. Any site improvement should address an identified soil problem and be appropriate to the conditions of the wider planting area.

Step 3: Dig the Planting Hole

Use the nursery root ball as your guide rather than digging an unnecessarily deep hole.

Make the hole large enough to position the root ball comfortably and allow you to settle soil back around it without forcing or compressing the plant into place.

Pay particular attention to depth.

The final planting position should not leave the lavender buried substantially deeper than it was growing in its nursery container. The root crown and lower stems should not disappear beneath a mound of new soil.

You can check the depth before removing the plant from its pot by setting the container beside or temporarily within the prepared area and comparing the existing soil line with the surrounding ground.

The goal is correct planting level, not the largest possible hole.

Step 4: Remove the Lavender From Its Container

Support the pot and root ball rather than pulling the plant upward by its stems.

If the nursery container is flexible, gently squeeze its sides to loosen the root ball. Tip or slide the plant out while supporting the soil and roots with your other hand.

Once removed, inspect the root ball.

Healthy roots may be visible around the outside. If roots are only lightly circling, handle them gently rather than aggressively cutting them apart.

If the root system is very congested, avoid turning the planting job into a major root-pruning exercise unless you have reliable guidance appropriate to that particular plant and condition.

Keep the root ball intact enough to protect the established root system, and handle the woody stems carefully. The plant is now ready to be positioned in the prepared hole.

Step 5: Position the Lavender at the Correct Level

Set the root ball into the prepared hole and check the planting level before adding soil around it. The top of the root ball should sit approximately level with the surrounding soil rather than being buried well below it.

If the plant sits too low, lift it out and add a little soil beneath the root ball. If it sits noticeably high, deepen the hole slightly. Make those adjustments now, while the plant is easy to reposition.

Avoid burying the crown or lower woody stems under extra soil. The goal is to preserve roughly the same planting level the lavender had in its nursery container while giving the roots direct contact with the surrounding garden soil.
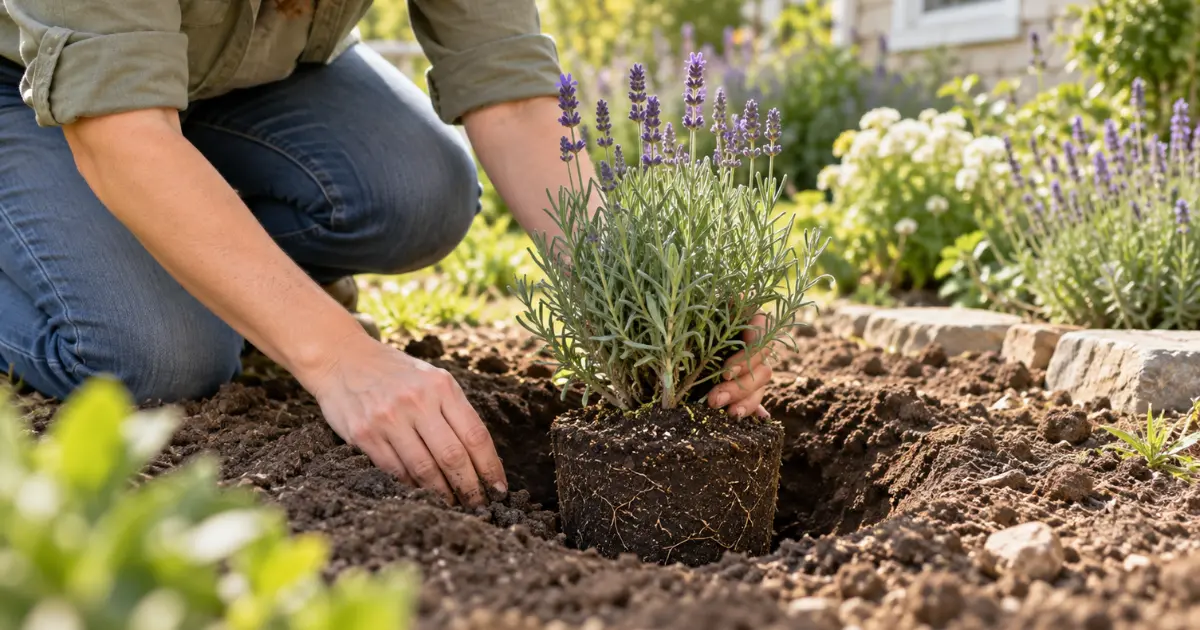
Lavender plant positioned with the top of the root ball level with the surrounding garden soil

Once the level looks right, make sure the plant is upright and centered before you begin backfilling.

Step 6: Backfill Around the Plant

Return the excavated site soil around the sides of the root ball a little at a time.

Use your hands to settle the soil into obvious gaps, but do not pound or aggressively compact it. The soil should hold the plant securely while still allowing air and water to move through the root zone.

Keep checking the planting level as you work. Do not mound soil over the crown or lower stems.

There is no need to create a rich pocket around the roots by automatically adding fertilizer, manure, or large amounts of compost. If the planting site needs broader soil improvement, that is better addressed as a site-wide drainage or soil-management issue rather than by packing a small amended zone around the root ball.

Step 7: Water After Planting

Water the lavender after planting so moisture reaches the root ball and the surrounding backfill soil.

This first watering helps settle loose soil around the roots and reduces large air gaps created during planting. It also gives the newly transplanted root system moisture at a time when it has not yet extended far into the surrounding ground.

Allow excess water to drain away. The goal is not to leave the planting area saturated.

This initial watering should not be confused with a permanent watering schedule. What the plant needs next will depend on rainfall, heat, soil drainage, the moisture inside the original root ball, and how quickly the lavender begins establishing.

Step 8: Give the Plant Room to Establish

After planting, avoid unnecessary disturbance around the root zone.

Keep nearby weeds and competing vegetation under reasonable control, and make sure neighboring plants are not immediately crowding the lavender. The roots need time to begin growing beyond the original nursery root ball and into the surrounding soil.

Watch the site after rain or irrigation. If water repeatedly lingers around the plant, that is a drainage warning rather than a reason to keep following the same watering routine.

For now, focus on stability, appropriate moisture, sunlight, and drainage. Long-term pruning, fertilizing, winter care, and flowering management belong to later stages of lavender care.

How to Care for Lavender Just After Planting

The first stage after planting is mostly about helping the root system settle into its new location without creating new stress.

A useful way to think about how to plant lavender successfully is that the job continues for a short period after the hole is filled. Check that the plant remains upright and that heavy rain or watering has not washed soil away from the root ball or buried the crown.

During early establishment:

  • watch the planting area after rain to make sure water drains away;
  • check moisture rather than assuming the root ball is either wet or dry;
  • keep weeds and aggressive nearby growth from crowding the young plant;
  • avoid repeatedly digging, moving, or disturbing the root zone;
  • observe the plant for signs that the site itself is unsuitable.

Do not add fertilizer automatically just because the plant has been transplanted. Newly planted lavender benefits more from appropriate site conditions and careful establishment than from an unnecessary feeding routine.

How Often Should You Water Newly Planted Lavender?

Newly planted lavender needs more attention to moisture than a mature, established plant, but there is no single watering interval that fits every US garden.

Rainfall, temperature, wind, soil texture, drainage, root-ball size, and local climate all affect how quickly the root zone dries. Colorado State University Extension, for example, provides establishment-watering guidance for lavender under Colorado conditions while also noting that irrigation amount and timing vary with soil, climate, and weather.

For a home gardener, the safer principle is to check conditions before watering.

During establishment, do not let the original root ball become severely dry for long periods. At the same time, avoid keeping the surrounding soil chronically saturated. Lavender is drought-tolerant once established, but a newly transplanted plant has not yet developed the wider root system of a mature specimen. If you are planning a garden with more plants suited to drier conditions, our guide to drought tolerant plants covers 20 choices for different home garden and landscape roles.Illinois Extension likewise notes that new lavender plantings benefit from regular watering while emphasizing well-drained conditions.

Water enough to moisten the root zone when watering is needed, then allow the site to drain. If the soil is still wet below the surface, adding more water simply because a calendar says it is “watering day” can create the wrong conditions.

This section is about establishment only. Once the plant is well rooted into the site, its long-term irrigation needs should be judged separately.

Can You Plant Lavender in Clay Soil?

Yes, lavender can sometimes be grown where the native soil contains a lot of clay, but the practical question is not the word “clay” by itself. It is whether the site drains well enough for lavender.

Clay soils vary. Some garden areas with clay texture still drain acceptably, while compacted or low-lying clay sites can remain wet for long periods.

Start by observing what happens after rain. If the proposed location stays saturated, forms standing water, or drains very slowly, consider a different position rather than trying to fix one small planting hole.

Where drainage is genuinely poor, a properly designed raised planting area can be useful. Illinois Extension specifically suggests raised beds when drainage is a problem for lavender.

Avoid the common shortcut of mixing a little sand or gravel into one isolated hole and assuming the problem is solved. Colorado State University Extension warns that adding sand or gravel to heavy soil can sometimes make drainage problems worse.

If you need to improve a clay site, think about drainage across the planting area rather than creating a small pocket with dramatically different soil from everything surrounding it.

Is Planting Lavender in Pots Different?

Yes. A container changes the root environment, so planting lavender in a pot requires separate decisions about drainage holes, potting medium, container size, and how quickly the root zone dries.

Those differences can be significant because a container has a limited soil volume and responds to heat, cold, and watering differently from garden soil.

The same broad principles still matter—sunlight, excellent drainage, and avoiding prolonged saturation—but the physical planting method and ongoing moisture management are not identical to in-ground planting.

For that reason, container lavender deserves its own focused guidance rather than being treated as a minor variation of the in-ground method.

Common Mistakes When Planting Lavender

  1. Choosing a site that stays wet.
    Persistent saturation around the roots is one of the biggest planting risks. Choose a better-drained location or address the wider drainage problem instead of relying on a small amended hole.
  2. Planting where there is too little sunlight.
    Lavender is a sun-loving plant. A shaded site may limit growth and flowering even when the soil is otherwise suitable.
  3. Planting too deeply.
    Burying the crown or lower woody stems can place the plant at the wrong level. Position the top of the nursery root ball approximately level with the surrounding soil.
  4. Spacing plants by their nursery size.
    Small transplants can become much wider. Use the expected mature spread of the cultivar when deciding how much room to leave.
  5. Keeping newly planted lavender constantly wet.
    Establishment requires attention to moisture, but “newly planted” does not mean “keep saturated.” Check the root zone and allow excess water to drain.
  6. Assuming richer soil is always better.
    Learning how to plant lavender includes resisting the urge to add fertilizer, manure, or large amounts of compost automatically. Lavender needs an appropriate root environment, not an artificially rich planting pocket.
  7. Ignoring cultivar and climate differences.
    Lavender types vary in mature size and hardiness, and planting seasons differ across the United States. Use reliable information for the plant you bought and the conditions where you garden.

Frequently Asked Questions About Planting Lavender

Can You Plant Lavender Directly in the Ground?

Yes. An established nursery-grown lavender plant can be planted directly into a suitable garden site with abundant sunlight and effective drainage.

If you are learning how to plant lavender from a nursery pot, focus on the existing root ball, correct planting level, spacing, and early establishment. This is different from sowing lavender seed directly outdoors, which is a separate propagation method.

Sometimes. Summer planting can work, but high heat can increase transplant stress and make moisture management more demanding while the root system is still establishing.

If you plant during hot weather, monitor the root zone carefully without keeping the site chronically wet. In very hot conditions, waiting for a less stressful planting period may be the better choice.

Use the plant’s existing root ball as your guide rather than an inch-based universal depth.

Position the lavender so the top of the root ball is approximately level with the surrounding garden soil. Avoid burying the crown or lower woody stems simply to make the plant sit deeper.

If the hole is too deep or shallow, adjust the soil beneath the root ball before backfilling.

Not automatically.

Compost can be useful in some soils, but lavender does not need a rich isolated planting pocket simply because it is being transplanted. The more important question is whether the site has suitable drainage and soil structure.

Utah State University Extension includes coarse compost as part of its English-lavender soil-preparation guidance, while Colorado State guidance for its conditions emphasizes low organic matter and warns against inappropriate amendments in heavy soils. Those differences are a good reason to match soil preparation to the site rather than follow one universal recipe.

It depends on the climate, mulch material, and reason for using it.

Some Extension guidance recommends inorganic mulch such as rock or pea gravel around lavender because it can help keep the crown drier. Illinois Extension also gives separate winter-mulch guidance for cold regions, showing that summer surface management and winter protection are not the same question.

Colorado State guidance allows rock or bark mulch in its system but advises keeping mulch away from the lavender crown.

For a beginner, avoid packing moisture-retentive mulch directly against the crown. If winter protection is your main concern, use guidance appropriate to your climate rather than assuming one mulch practice fits every region.

There is no universal number of days or weeks.

Establishment depends on plant size, root condition, planting season, soil, drainage, moisture, weather, and climate. A plant can begin producing roots into surrounding soil before it reaches anything close to mature size.

Watch the plant and root-zone conditions rather than using a countdown. As establishment progresses, the lavender becomes less dependent on the moisture held within its original nursery root ball and increasingly rooted into the surrounding site.

Give Lavender the Right Start

The key to how to plant lavender well is not a complicated amendment recipe or a perfectly measured hole.

Choose a planting period that gives the plant a reasonable chance to establish in your climate. Put it in abundant sunlight, prioritize excellent drainage, allow enough room for its mature size, and set the root ball at an appropriate level rather than burying the crown.

Backfill carefully, water the newly planted root zone, and then manage moisture according to actual soil and weather conditions instead of keeping the site constantly wet.

Those simple decisions matter because planting establishes the environment the roots will have to live in long after the nursery pot is gone.

Give the plant a suitable site and a careful start, then allow it time to establish without unnecessary disturbance.

Leave a Comment

Your email address will not be published. Required fields are marked *

Scroll to Top